Cloud Timesheets and Work Tracking
This is the first of several sequenced Learning Center articles that show you how to setup Pacific Timesheet for the Enterprise. Follow the links placed in each article for more in-depth information.
System Description
The Pacific Timesheet Cloud Service is hosted by Pacific Timesheet. It requires no software,servers, or mail servers. Users only need a standard browser such as IE, Chrome, Firefox or Safari. The application will not install any thin or fat client on user browsers. It can be reached by users from anywhere any time. Pacific Timesheet also provides an on-premise self-hosted software version of the cloud service.
System Use
The system is web-based, meaning it is a server-based system that serves up web pages to users through a browser securely. User access is controlled by security permissions assigned to their employee profile or to the information profiles to which they have access.
Steps to Setting Up System
First Things First
This is an enterprise-class system that requires you set it up in the right sequence. The easiest way to understand the setup is:
Razor Blade/Razor Analogy

Before there were disposable razors, men and women used to insert razor blades into handheld razors when they shaved their face or legs. System settings (e.g. employee types, security permission profiles, work breakdown structure, policies, pay codes, timesheet templates, billing rate options, approval level assignments, etc.) which are found on the "System" tab, are like an old-fashioned hand-held razor (shown floating sideways on the right).
An employee's profile data (such as John Smith's employee type, his policy, timesheet template type, etc.) are like an old-fashioned razor blade.
When you have the wrong handheld razor, the razor blade won't fit properly. Similarly, for Pacific Timesheet, if you do not have the system setup with the employee types, policies or timesheet templates that you need, your employees won't fit into the system properly when you import in their data.
Getting Data Into The System
Getting object profile data into the system by hand, especially if you have hundreds or even thousands of employees, groups or projects, will take forever. Fortunately, we have a way to automate this.
Remember these three concepts and setting up the system will be a breeze:
- Every object has a unique name and ID to identify it for other operations (e.g. employee, group, project, task, etc.).
- You can import all object data using imports found under the more button for each object. The more button is found next to the add/delete keys on the right of the object tab. You can easily create import files by using the export for the object and then filling out that .csv file with the employees you want to import. You can import employees, groups, projects, activities, tasks and even historical timesheet data this way.
- You can update object data using imports. Given that all employees, for example, are unique, you can easily update these employees' profiles by importing a employees.csv data file and matching each profile in that file against its unique name or ID.
Pacific Timesheet even has an "auto-import" feature (found under System>Data Integration>Auto-import. Here you can FTP or FTPS import files and the system will automatically import these files, mark them as processed and detail any data matching errors that prevented the import from completing. We have many clients importing more than 80,000 items this way every five minutes, once per day, or once per week.
Setting Up System Areas
We will step through setting up the following system areas (the handheld razor). Here is a description of each area and how it functions.
System>General
- Week start (the day on which your weekly time period begins)
- Default Locale (the predominant locale - time, date, number format and days of the week in the local language of the locale - for most employees in the system. You can override this setting for each employee in their profile)
- Default Time Zone (The predominant Time Zone for your system. You can override this setting for each employee in their profile)
- Email notifications initiated by the system and delivered by your mail server to users (our mail server settings are already setup for you)
- Audit trails (Set to DCAA High to audit timesheet edits, non-daily timesheet entries, edits to timesheets by others, and changes to the system setup by system adminstrators)
System>Work Breakdown Structure
You can enable up to five WBS item levels. Our default names for these levels are:
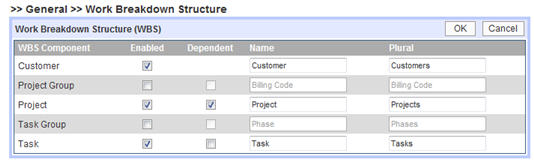
You can customize these names to whatever you like. Note the dependent checkboxes allow you to make Projects "depedendent" upon Customer. This creates a place in each project profile for you to assign the project to a particular customer. Later when users browse to add WBS items to their timesheets, when they select a Customer first, they will be restricted to adding only those projects assigned to that customer.
System>Time Periods
Time periods (e.g. weekly, biweekly, semi-monthly, monthly) can be used to render timesheets and reports. You can configure custom weekly, biweekly, semi-monthly, or monthly time periods to render employee timesheets. For example you might want a semi-monthly time periods that have two time periods per month. You can customize them to begin on the 1st and 15th, the 1st and 16th, the 3rd and 18th, or whatever dates you want. Monthly time periods can begin on any date of each month. Yearly time periods can be created for fiscal years by having the year begin on October 1st or July 1st. Custom time periods can be created to begin and end on any dates you want. Beside rendering employee timesheets to render with certain start and finish dates, time periods also are used as an anchor for email timesheet reminder and late notices that are scheduled to trigger at certain times before or after the end of a time period. The time period The weekly, biweekly, semi-monthly, monthly and custom time periods are used to render timesheets. No one, to our knowledge, has quarterly or yearly timesheets. Time periods are assigned to timesheet templates and tell the timesheet what start and finish dates it should have.
System>Approval Levels
You can have up to five approval levels for submitted timesheets and time off requests. The approval levels can be assigned in the employee profile so you can create complicated approval paths not ordinarily supported by other systems. You can also assign approvers directly to a Crew with a certain security permission, e.g. supervisor, general foreman, client, etc.) so the user can approve crew timesheets on a daily basis or using the crew approval kiosk. You can create other approval levels such as payroll manager or billing manager.
System>Holiday Schedules
Holidays can be setup by creating a name and specific date on which it will fall. Without any special restrictions, holidays will be available to all employees in the system. You can restrict certain holidays to groups of employees by assigning them to groups or locales. Most of our customers with large global operations use country groups to assign holidays. Holidays, when combined with enabled schedule rules (system>policies>schedule rules) can be pushed automatically onto employee timesheets. You can restrict this from happening using timesheet template settings (system>templates>timesheet template>advanced settings>time entries allowed>work only) for part-time workers who do not get holidays.
- Bill Rate Options (Bill rate exception rules)
- Pay Rate Options (Pay rate exception rules)
- Employee Types (Nonexempt, Exempt, Contractor, etc.)
- Assets and Forms Tracking Options (equipment tracking, materials tracking, supervisor logs, etc.)
- Project dashboard options
- Terminology (define key terms, e.g. leave = time off)
- System Branding (upload organization logo, set custom system name)
- Data Integration (auto-import settings, object data exports, timesheet data exports, REST web services)
Timesheet Templates
Timesheet templates securely render employee timesheets user a browser. You can create any number of different timesheet templates for different needs and assign them to employees. A few example timesheet templates (though not limited to these examples):
- Nonexempt Timesheet. An attendance-oriented timesheet, captures daily in/out times and shows pay code totals (e.g. Regular Time, Over Time, etc.). Key time entry fields: Start*, Finish*, Hours* Key total field options: RT, OT, DT, Work Hours, Time Off Hours, Total Hours. For RT, OT, DT totals to show, you must enable and setup overtime rules in the Nonexempt employee's assigned policy.
- Exempt Timesheet. For salaried workers, you can capture leave but not work hours. In advanced template settings, you can make this a Leave only timesheet, or allow the employee to enter work and leave hours. The totals options are total hours, work hours, leave hours.
- Project Timesheet. You can capture hours against customers, projects and tasks. Add work items from your WBS to the template. You can setup this template to track start and finish times to punch in and out of projects by adding the start and finish fields. You can also track work and leave and show hours, work, and leave hours totals.
- Other template options. In advanced options: you can create a percent time entry timesheet, or presence/absence (checkbox) timesheet.
* Field is required for template type.
Employee Policies
Employee policies allow you to control a variety of timesheet options, such as rounding rules, leave accruals and over time calculations. Employee policies is found under System>Policies.
Pay Codes
Pay codes are customizable values that you can use to track different types of work and time off hours. Work pay codes can include regular time, over time, etc. Time off pay codes can include sick, vacation, etc. Work pay codes are used for tracking overtime and create regular time and overtime totals in the database that can be sent to a payroll or accounting system. You can have overtime computed automatically by enabling overtime rules for the employee policy. Pay Codes are found under System> Pay Codes.
Time Off and Absence Management
You can have an unlimited number of time off pay codes, such as sick and vacation. Each time off pay code can have an associated balance. Any hours an employee enters on their timesheet for these pay codes will automatically have an equivalent amount deducted from their balance. Rules for whether balances are allowed to go negative, as well as automatic accruals, are configured by editing the balance rules on the appropriate employee policies. Employees can also request time off and have it approved or rejected by managers. When approved, time off can automatically be scheduled, pushed onto timesheets and employee calendars. Time off pay codes under System>Pay Codes. Accrual and balance rules are configured under System>Policies>Accrual and Balances Rules. Time off email notices are configured under System>notices.
Adding and Managing Projects/Tasks
Depending upon your work breakdown structure, you can create an unlimited number of work items to track projects, activities or tasks. The work breakdown structure can have up to five levels. Work items can be imported and synched from any third party system. Work breakdown structure is defined under System>Work breakdown Structure (WBS). The work items, e.g. customer, project, task, are setup under the task tab. This tab will always be named with the lowest level WBS item, such as tasks.
Adding and Managing Employees
You can import employee data, and later on sync employee profile data every hour or day from payroll or accounting systems. You can setup employees in the Employees tab. To import/export employees, employee balances, employee bill rates, employee pay rates, click on the downward-pointing blue triangle next to the add/delete buttons. You can modify the term Employees to another term (e.g. resources, associates, etc.) under System>Terminology.
Adding and Managing Groups
Employee groups can represent a variety of different logical entities, such as cost centers, departments, or permission groups. You can setup groups under Employees>Groups. You can modify the term Groups to another term (e.g. department, division, unit, etc.) under Systems>Terminology).
Security
System Access: The system supports secure socket layer (SSL) access, or https access, over major browsers such at IE, Firefox, Chrome and Safari.
Password Security: Under System>Security you can set password policies. We generally recommend at least setting
Security Permissions: Employee permission levels control what access to the timesheet system the employee will have, as well as giving fine-grained control over some aspects of time entry. Security permissions can be set with view, reporting or editing controls on every object in the system. System authentication for login security can use the system’s login security and password rules, or it can be controlled by enabling LDAP/Active Directory. You can access Security Permissions under System>Security. The top section called Security is for setting password policies. We generally recommend no less than setting a maximum of three failed login attempts. Security permissions below are for granted and restricting access to various features and system areas. The system comes with a few default security permissions: Employee, Timekeeper, Manager, Administrator. You can clone any of these with a new name, or you create new security permissions from scratch. As a rule of thumb, review all permissions, especially for managers, and err on the side of restricting access first. You can always open up access later.
Reporting
A variety of reports are available, and can be customized for your requirements. Pacific Timesheet allows you to publish your custom reports and make them available to any suitable permission level. For instance, you can make a customized department report available only to managers, or a “my hours summary report” available to employees. Reports have two basic types: summary reports and details reports. Summary reports summarize or add up data over a specified date range. The reports the render on the Reports tab are all templates which you can customize and name by clicking on New. You can publish these reports to security permissinos by clicking on the Published checkbox and selecting the appropriate security permissions. These reports will appear in a new area for employees with these security permissions called "Published Reports." When creating reports note that you can pre-set date ranges using the Time Period preset, such as This Month, Last Month, etc. If you set this and name the report "Report Name - this month" you have a one-click report that will always render this month's data. Nice feature. You can always pre-set the report formats such as portait/landscape or page size (legal, etc.) for what you expect to be very wide reports. All reports will render in HTML on the screen. From there you can use the filters on the left side to focus on certain employee, departments, pay codes, work items, etc. You can pick several of these in a range by clicking and dragging your cursor. You can also select non-contiguous items by holding the control key and clicking on multiple selections. After selecting your items, just click on run again and the filters will re-run the report with your selections. Any report you see on the screen can be exported to Excel, .csv or pdf formatted files by selecting the appropriate report format and clicking on run again. You can open these up immediately or save them to a directory location. All reports support sql expressions which can provide variance calculations and filtered results and more advanced reporting formats. Contact your representative about any reporting requirements that you need assistance with.
Audit Trails
You can enable the audit level to stringent auditing requirements. The system audits edits to timesheets and administrative changes to the system. You enable the audit trail on System>General.
Customization
All objects can be customized to add additional data fields with up to twelve data types. For instance, you might want to add an employee photograph to the employee object, or a location pick list to the timesheet template. Employees, Groups, WBS items, Assets and other object custom fields are managed by clicking on the downward triangle on the tab of that object. Once you create these custom fields they can be added to time and asset entry templates, and object profiles. They will be immediately ready for importing and exporting and reporting.
If you need any help setting your trial you can always request a demo/setup meeting.