Accurately identifying employees is a critical first step when managers assign them as resources to particular tasks. Pacific Timesheet allows you to store employee photos as part of their employee profiles. Once stored, they can be rendered in several place in the product:
- Employee profiles (read only or editable)
- Employee picklists used to select employees for groups, crews, and security permission assignments for projects, tasks, groups, etc.
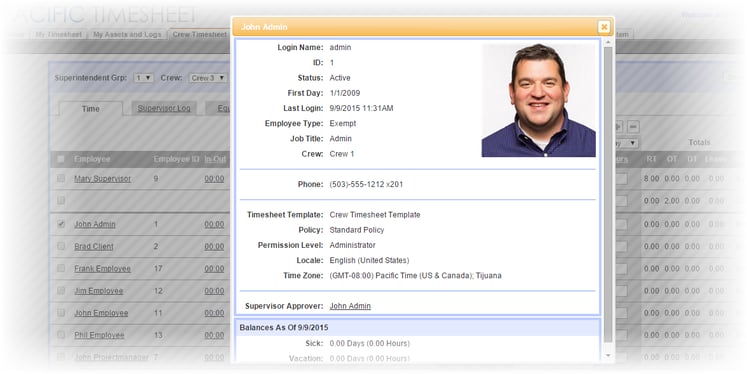
- Employee mini-profiles available in employee timesheets, crew timesheets, and thumbnail photos on approval dashboards, time off requests, and email notices.
Step by Step Instructions: How to Setup Employee Photos in Pacific Timesheet
Employee profiles have a standard photograph field that stores an employee photograph. Supported formats are PNG, GIF and JPG, and it is recommended the image be square and approximately 180x180 pixels. You can specify an image up to 500x500 pixels, but it will be scaled to 180x180 in web pages. Also, the file size must be no greater than 48K bytes.
Getting Employee Photos in System
There are two ways to get employee photos in the system. One is manual and the other is automated process.
Manually Entering Photos
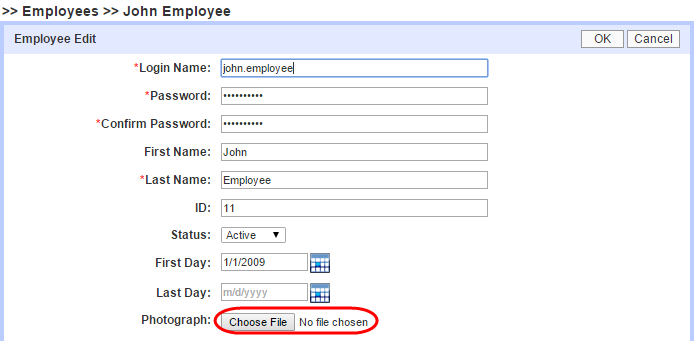
To manually store an employee photo edit an employee profile, go to the photo field, and select a photo from the photo library of your device.
Supported devices are PCs, laptops, and tablets with photo library directories you can access.
Situations Where Entering Photos Manually Makes Sense
- You company has a small number of employees and an automated process is not necessary
- You have new hires in the field that you are enrolling for that day’s work. You can create the new employee’s profile in the field, take a photo of the employee with a tablet and upload the photo to the employee’s profile so different foremen and superintendents can identify him that first day.
Automatically Importing Photos
You can upload employee photographs in bulk using the Pacific Timesheet auto-import utility.
This involves two steps: 1) uploading the employee photograph image files and 2) uploading a modified version of your employees.csv configuration file.
Use Any File Naming Convention
This two-step process allows you to use any naming convention for the employee photos. In this way, if you have a photo management database or application you can use the naming convention of that system when you create and export your employee photo image files.
Assign Photo Image Files to Employees
After uploading your employee photograph files, then you can upload a simple employees CSV file with two columns with this header/column layout:
Login Name,Photograph
employee1,photos/emp1-photo.jpg
employee2,photos/emp2-photo.jpg
..
How It Works
When you upload the employee photos they are stored in a temporary waiting area. Then when you upload the employee photo assignment CSV file, the system will assign each employee’s photograph file to appropriate employee profile.
Technical Details
Remember to setup a photos subdirectory on your Pacific Timesheet FTP site and upload the image files to a “photos” subdirectory for better audit tracking and controls.
Login Name,Photograph
employee1,photos/emp1-photo.jpg
employee2,photos/emp2-photo.jpg
...
Auto-Import Setup and Management
If you have a large system with hundreds of employees you will already have an auto-import utility enabled. See the Auto-Import online help topic for more information or refer to any auto-import setup and credentials documentation we have already provided you.
Web Services Option
If you have already store and post employee photographs on an employee portal or company intranet you can use the URLs referencing employee photo image files to upload these image files into Pacific Timesheet. In this case, you could just generate an employees.csv file containing the employee photograph image file URLs and upload that using the Pacific Timesheet auto-import utility. The format of this file would look like this:
Login Name,Photograph
employee1,http://xyz.com/images/photo1.jpg
employee2,ftp://xyz.com/pub/foto2.gif
...
Supported URL formats for the Photograph field in the import file are HTTP, HTTPS and FTP. You can manually import the file using the Employees>Import Employees tool, rather than using the auto-import directory. When set the employee’s photograph this way, Pacific Timesheet stores a copy of it in the system. This allows you to change the URL (location) of the employee photograph image file without issue.