logo-2015-v11

Learning Center


learning-center-white

Timesheet Approvals Dashboard Columns Now Configurable

Posted by Pacific Timesheet Support on Oct 28, 2014 7:00:00 AM


Timesheet Approval Dashboard Enhancements

Pacific Timesheet's approval dashboard allows approvers to approve or reject individual employee timesheets. It also allows payroll management and system administration users to mass approve or submit employee timesheets. Customers have requested that the information columns in these dashboards be customizable, perhaps to provide more information when trouble shooting approvals.

Read More

Topics: timesheet approvals

Advanced Timesheet Reporting Filters

Posted by Pacific Timesheet Support on Jun 12, 2014 5:06:00 PM

Many of you, under payroll and other reporting deadlines, need to get at your data fast. And when troubleshooting data, it's a matter of quickly narrowing or filtering down data to what you need to see.

For any report, whether for employee timesheet report, equipment or materials entries, Pacific Timesheet allows you to dynamically filter reporting data by major objects in the system: e.g. employee, group, project, task, etc. A strength of our custom reports is that our filters were always easy to use for short lists. To do this you just click on a filter list item while holding down the control key.

Filtering Big Lists Cumbersome using Control Click

However, selecting list items for really large lists can be more challenging. While many of you have become quite adept at this, to select multiple items from a filter list requires scrolling through the list and select each item by clicking on it while holding down the control key. 

A dynamic filter list has advantages:

1) It shows users a "preview" of the list items they will be able to report on, including items that are "pre-filtered" in by our security permissions, or those pre-filtered into the report when setup administratively.

2) Once you learn the control click method, there's nothing else to know about selecting items. It's simple. 

While all this sounds great, there are very specific deficiencies:

1) Control clicking non-contiguous ranges of pick list items over many hundreds of items is harder than any video game.

2) Marking a bunch of contiguous and non-contiguous list items, and then unmarking a few of them is very difficult. 

3) If you only need to select a couple of items from a large list, scrolling, finding the items, and control clicking takes too much time.

While many of you have learned do this, we considered this way of doing things "painful" at best.They are not in keeping with our motto: 

"Smart. Flexible. Fast."

Not smart, because simple mistakes using the control click selection method could easily make you feel dumb (when you're not).

Not flexible, because modifying or unselecting already selected list items, without inadvertently un-selecting all the items can be very difficult (making you have to perform death-defying feats just to run or re-run a report with different filtering).

Not fast, because doing it this way, and maybe having to redo or re-select items, can be rather slow.

So, here is a better way.

Scrollable Searchable Include/Exclude Filters

Getting Your Head Around The New Filter

Technically, the UI of a reporting filter should only show the items you have selected to include in a filter. A filter "filters." As in coffee, cars or audio EQ, filters restrict or limit what goes through a filter and what ultimately comes out of the other side. In reporting, a reporting filter restricts what you will be able to see after you run a report. In our product, when no filters are applied, visually, the filter list box should be empty. This tells users that no filters have been added to the report and that they will get back all results they are allowed to see. When you add items to your reporting filter, you will see those filter items in the list box.

Exclude Filter

But about the opposite case? When you have a big list and want to exclude a few items?

Walking through the New Filters

Using the Plus Button

  • To select list items just enable the filter check box, say for employees.  
  • The list box on the left will be empty.  This means that when you run the report all results with be returned.  In other words, you have not selected any items to filter, so all data a user has permission to see will be returned in the report.
  • When you want to start filtering a report, click on the Plus (+) button to the right of the filter to start selecting items to include in your filter. For employees, this would mean selecting the employees you want to show up in the report.

Scroll, Select, Add

  • Use the scroll bar in the select dialog and scroll through the list, selecting each item's checkbox along the way.
  • When you are done selecting items just click the Add button and the items will be added to the filter on the right. Then run the report. Simple and easy.

Include/Exclude
After selecting your list you can pick from one of two operators (include or exclude) when running the report filter.

  • Include will run the report by including items you have in the list. We call this an "include list."
  • Exclude will run the report by returning data on all list items except those on the list you exclude.  We call this an "exclude list."

Searching Very Big Pick Lists

If you have projects and/or employees numbering in the thousands, and you are selecting only a few items to include in the report, use our new search feature! This new feature allows you to search for a pick list item by just starting to type in a search box (as you would in a Google search).

  • Click on the reporting filter Plus (+) button.
  • As you start typing characters, the system automatically start to return search results, and shortens the list with each character you type, until you have the pick list item you are looking for.
  • Then just click the checkbox next to the item and click Add to add it to the list.
  • Repeat this for each search.  
This is a great option if you are selecting 5 to 10 items from a large list of items. After you are done, if you change your mind on items you've selected, it's very easy to remove an one or two items from the list. Just mark the item or items you want to remove on the right, and then click the Minus (-) button to remove them. Then re-run the report.   

Filtering Reports With Short and Large Lists

Our report filters will handle long and shorter filter pick lists as follows:

  1. 100 items or less. The filter pick lists can be used for lists of 100 items or less, what we consider short lists. This will be helpful for filtering short lists of pay codes or if you do not have a large number of groups or projects. This will work using the control click method that you are used to. This default short list defaults to the include filter setting, meaning the report will include data from items showing in the list.
  2. More Than 100 Items. When filtering items of more than 100 you will now use the Plus (+) button to open the pick list dialog for easy scrolling, and select check boxes and list item searching. You can keep the include filter setting, or you might change to the exclude filter setting.

A Quick Review of How To Use New Reporting Filters    

Read More

Topics: Reporting

Setting Up Pacific Timesheet Enterprise

Posted by Pacific Timesheet Support on Apr 5, 2012 5:08:00 PM

Cloud Timesheets and Work Tracking

This is the first of several sequenced Learning Center articles that show you how to setup Pacific Timesheet for the Enterprise. Follow the links placed in each article for more in-depth information.
 
System Description
The Pacific Timesheet Cloud Service
 is hosted by Pacific Timesheet. It requires no software,servers, or mail servers. Users only need a standard browser such as IE, Chrome, Firefox or Safari. The application will not install any thin or fat client on user browsers. It can be reached by users from anywhere any time. Pacific Timesheet also provides an on-premise self-hosted software version of the cloud service.

Read More

Topics: split shift premium, timesheet, Timesheet Software, Time Tracking Software, SaaS Timesheet, Online Timesheet, leave timesheet, Time and Attendance Software

Filtering employee reports to specific roles or groups

Posted by Pacific Timesheet Support on Jul 7, 2011 5:47:00 PM

Employee reports (e.g. Employee Hours, etc.) do not have a built-in filter for limiting the employee records returned to specific roles (permission levels) or reporting groups. But you can do this easily by creating a custom filter using SQL. To limit employee records to a particular named role you can use something like the following SQL custom filter:
 
t_user.roleid IN (select id from t_role where name='Employee')

To limit employee records to a particular named reporting group you would use something like the following SQL custom filter:

t_user.groupid IN (select id from t_group where name in ('Group 001','Group 002'))

To exclude a role or group you would use NOT IN instead of IN in the above expressions. You don't have to be a SQL guru to use custom filters, but it helps to know the basics. An excellent source for information can found at W3 Schools (http://www.w3schools.com/sql).

Read More

Tech Note: Showing the approver's name in a report

Posted by Pacific Timesheet Support on Apr 21, 2011 7:04:00 PM

The reporting engine in Pacific Timesheet allows you to choose from a large number of data fields when reporting on employee time sheets. However, the employee's approver is not available from the pull down list of column fields. What to do? A SQL expression can help you - the following SQL will show the full name of the level 1 approver for an employee:

Read More

Creating annual reports that group data by week

Posted by Pacific Timesheet Support on Oct 6, 2010 7:07:00 PM

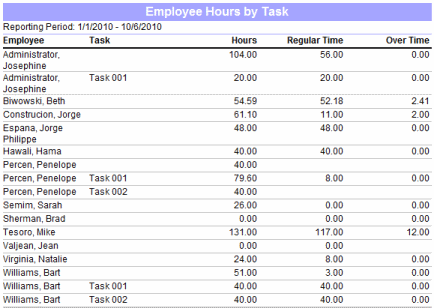
Sometimes you need to summarize timesheet data by week over a longer period, such as a year. In Pacific Timesheet you can use sql expressions to create an annual timesheet report that groups or summarizes data by week. Normally when running timesheet reports, such as Employee Hours, the data is totaled for the entire reporting period. For example, the Employee Hours by Task report looks something like this when run year-to-date:

You can have this report summarize the data in weekly groups by using the following SQL as a grouping:

STR_TO_DATE(CONCAT(YEARWEEK(t_timeentry.strt,0),'0'),'%x%v%w')

This SQL is only valid for MySQL, but similar constructs can be made for Microsoft SQL Server and Oracle. When you group by this expression the hours data will now look like this:

Here you see the same data, only summarized by the week of the year.

A newer solution is Interval Reports found in the other reports section of the reports tab. Interval reports allow you to select an time interval such as a week, biweek, month or quarter over a defined time period.

Read More

Keeping Your Data Safe

Posted by Pacific Timesheet Support on Mar 19, 2010 7:18:00 PM

Your Pacific Timesheet software contains sensitive data, such as employee hours and pay rates, project bill rates, etc. The following tips will help you reduce the risk of unauthorized access to this sensitive data:

Read More

Reporting on "Regular Hours"

Posted by Pacific Timesheet Support on Mar 1, 2010 7:32:00 PM

What to do when regular hours include vacation, sick & other leave

Some organizations have a concept of "regular hours" that is different than the Pacific Timesheet "Regular Time" pay code hours. For instance, your company might consider "regular hours" to be all hours that are non-overtime work hours, plus any leave hours that are not 'Unpaid Time Off'. To report on employee "regular hours" you can create a new Employee Hours report on the Reports tab (click the New link to the right of the Employee Hours report). Then add the following SQL expression report column by clicking the Add SQL Expression column at the end of the columns list:

Read More

Leave-only Timesheets

Posted by Pacific Timesheet Support on Feb 21, 2010 7:48:00 PM

How to configure timesheets for employees
who only need to record leave

Pacific Timesheet allows you to create timesheet templates that only allow leave or time-off to be placed on them. If you have a group of employees that are only required to record leave, then all you have to do is go to their timesheet template and edit the advanced settings to only allow leave time entries:

Read More

Topics: Time Off Management, timesheet, Timesheet Software, Time Tracking Software, time tracking, leave timesheet

Turning Off Partial Day Leave Requests

Posted by Pacific Timesheet Support on Feb 5, 2010 7:42:00 PM

Disabling partial day leave requests for specific leave types

Partial day leave or time off requests are not always allowed in some organizations. For instance, you may require that employees take a full 8 hours of vacation for a day, or none at all. You can control this from your employee's policy on the System > Policies page. To disable partial day leave requests edit the policy's time entry rules:

Read More

Subscribe Now


Recent Posts